Friday 28 March 2014

Fountain and Son, Beadmakers


I had quite a surprise when I got up this morning.  You've read the story about the Elves and the Shoemaker, right?  

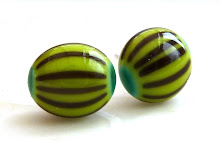
When I went to bed last night I left my son having a go at making my Sunspots beads - and watching Homeland on Netflix.  This morning he was still hard at it, he worked all night!

It looks like he's got the hang of the beads, and he's halfway through the second series of Homeland now!

Anyway, it turns out he wasn't doing this just for fun - and now I know why he's been home this week, eating my fridge bare.  Next week he starts a new job, but this week his rent is due and he doesn't have any money.

So here's the deal.  I usually sell my Sunspots beads in sets of 12 for £25.  
But this young starving artist needs cash, so how about 6 Apprentice Sunspots for £10?

And for an extra £3.50 we'll make them into a ready to wear bracelet or necklace.  Sounds like a great deal to me!


(PS don't worry, beads will be cleaned and annealed before sale.)

Thursday 14 November 2013

Owl Tutorial

I originally wrote this tutorial in September 2011 for Beverly Hicklin's Make Glass Beads resource but she has now taken that offline so I thought I'd preserve it here.


I noticed that owls are really fashionable right now, they’re on fabrics, stationery and people are even making owl-shaped beads!  I was looking at a heart focal I made and realised the shape would make a great base for a wise old bird ...

   
1. First of all make a heart shaped bead. Use a press or shape by hand.


2.  Heat the surface of your bead and roll in frit to decorate – I used a fine iris orange (raku) frit for a feathery look.  Melt frit smooth.

   
3. Apply large dots for the eyes, press flat into the bead, then cover with a large dot of coloured transparent.  I used Effetre sky blue and Effetre transparent medium blue.

   
4. Pick up a murrini chip in the tip of tweezers, flash the bottom of the chip in the flame and at the same time, lightly warm the eye area, then apply the murrini onto the centre of the coloured dot.  Twice!

   
5. Warm and gently press the murrini down with a marver.  Do this a few times until the murrini chips are almost – but not completely – flat.  Use a sharp point to poke the centre of each chip.

   
6. Cover each murrini with a dot of clear to really magnify the murrini for proper owl eyes!

   
7. Add two large dots at the bottom of the heart and flatten from the bottom to make feet.

   
8. Use a razor tool or knife blade to mark claws in the feet dots.  I used sky blue for my owl’s feet.

   
9. Add a large dot in between and below the eyes, then use tweezers to pinch into a beak shape, it should be long and narrow, slightly wider at the top than the bottom.  I used dark chocolate brown.

   
10. Add feathers!  I made 6 large raised dots in sky blue, then added another small dot on top of each one to make them look a little spiky!

HOT TIP
Give the owl eyes extra depth by shaping the socket with a flower rod tool from Mango Beads: heat and soften the eye area, lay the bead back in the heart press or on a marver to support the shape, then gently press in the round tool to make indentations for eye sockets.  Add the opaque and transparent dots, then support and indent again before applying the murrini.


All glass from www.tuffnellglass.com , frit and murrini from www.kazkebab.etsy.com , flower rod tool from www.mangobeads.co.uk , heart presses from www.beadpress.nl or www.bavarianbeads.de

Tuesday 2 April 2013

Colour by Numbers

It's that time of year again, when my glassy friends and I get all giddy and excited, and I get up at stupid o'clock because I've got so much to do (5.30 this morning, unheard of!).  

It's better than Christmas, more exciting than birthdays ... it can only be Flame Off 2013!  I'd describe it as Glastonbury for beadmakers, without the mud!

I will be selling at Flame Off on Friday and Saturday, and also at Silverstone Bead Fair on Sunday (the exhibitor list on that link hasn't been updated for a while), so I've been doing some serious preparation for what feels like months (but is probably only a couple of weeks to be fair, I'm all last minute as usual!).
The Hoops and Loops are counted, bagged and ready to be picked like cherries  by (hopefully) hordes of eager bead and jewellery makers.

I've made lots of new beads, especially these "Colour by Numbers" sets - the same beads in lots of different colourways, I've really enjoyed making them, it's like working to a formula.
I made some new mixed seaside sets in a similar style too, 
and I couldn't resist making one set up into a necklace.


Flame Off is taking place at Silverstone Race Course on Friday and Saturday, 5th and 6th April, followed by the Bead Fair on the 7th, 10am to 3.30pm.  There is an admission fee for both events.


Friday 15 March 2013

Always Learning

I took some time to try out a couple of ideas yesterday and actually got to grips with two things that I've been struggling with, like, forever!


I made off mandrel hearts that are actually big enough to wear and have a functioning loop, woo hoo!

And I blew my first ever successful shard bulb! I know, five and a half years of beadmaking and I couldn't blow shards, shocking isn't it - but I did it, and hopefully I'll be able to do it again.  Today I will see if the shards I made are actually usable. 

(Excuse the rubbish phone photo)

Just listed on my website are some new wonky buttons and a pretty set for spring.

Monday 11 March 2013

Beyond Beads

It's been a while since I wrote a tutorial for a magazine, so when Beads & Beyond asked if I could make beaded keys, I jumped at the chance.

The two page spread looks lovely and the instructions are very simple for any ability of glass beadmaker to follow.

I made a few extras and have now listed them in my Etsy shop and on my website.  

When the originals come back from the magazine, I will list those too (well, I might keep one for myself!).

They make unique pendants, hanging decorations or even very unusual keyrings!

Friday 1 March 2013

Ossa - new from Double Helix

Yesterday I received a few rods of the new Double Helix glass from Tuffnell Glass, and I got straight out to the Lusherie to put it through it's paces. Both the rods and the beads are more purple (amethyst rather than Cadbury) than they look in any of my photos.

According to Tuffnell's website, Ossa is the first of DH glass's "new speckled lustres". The rods are very unusual, heavily textured with little bumps that are apparently "thousands of refractive inclusions".  When heating the glass, I found it can be prone to boiling, but this didn't appear to affect the bead.

It reduces quite easily and seems to prefer oxygen down rather than propane up, but that may just be because I work hot with two oxycons. Unfortunately I think I tend to be a bit heavy handed with reduction glasses and get a lot of yellow streakiness rather than subtle mother of pearl! I do like this little encased bead though, it reminds me of the brass wire effect with tiny golden bubbles. 

I thought a tornado bead would be a good style to show Ossa both reduced and not. There's lots of free tutorials around if you want help with this technique.

Simple surface reduction results in very shiny beads!

On the whole, Ossa makes me think of goldstone with the benefit of metallic effects. I think these disc beads really do the glass justice.

A nice photo to finish with ... The top of a wave bead - you can't see the bottom, but it's lovely and shiny.


Wednesday 13 February 2013

A good lesson to learn

I had such a great day yesterday - I had a proper cabochon-setting lesson with my great friend and regular "partner in design" mizgeorge, George Harper East. 

I have made a few cabochons recently (cough cough) and now I have a good idea of what to do with them!

I made the ring with the red and purple cab, George made the one with the lime centre so she could teach me the method, step by step.

Then I made this amazing pendant - isn't it just fantastic?!

I've been shopping this morning, buying up all the bits and pieces I need to make more rings and pendants at home.  

Ooh, I hope I can do anything like as good a job on my own!

If you'd like to learn to do pretty much anything in silver (or any other metal!), I can't recommend George's teaching enough.  She's patient, encouraging, has all the best designs and is crazy clever!

Oh, and of course, if you need cabs to set, there's a few to choose from in my Etsy shop ;0)  Or if you'd like to make your own cabs to set in your own ring, you might find my new eBook helpful too!