Sunday, 13 February 2011
Competition Winner
In my January post I set a competition to win an Adjustable Bracelet Kit (oops, I was meant to draw the winner on 9th Feb!)
"on how many pages in Making Jewellery Magazine issue 24, does a Lush
Lampwork item appear?"
So the answer was higher than most people thought - including me!! I originally thought my items turned up on 9 pages, then somebody told me 10, but in fact it was 11!
1. Top of front cover
2. Intro page 1
3. Page 3 (a tiny pic, this is the one that caught most people out!)
4/5. Bracelet tutorial pages 4 and 5
6. Colour & Style feature page 20
7. There's that front cover again on page 58
8/9. Lampwork tutorial pages 70 and 71
10/11. Product review pages 82 and 83
See, I really was All Over Making Jewellery Magazine!
Thanks to everybody who entered - I put your name into the winning draw if you guessed 9, 10 or 11 - then used a Random Number Generator to select the winner.
And the winner is .... Rita!
Congratulations Rita, an email is on its way :0)
Tuesday, 8 February 2011
Testing Helios and Marine Wave
I mentioned in my previous post that I have been doing some more testing and now I can share my results.
First up is Helios, the new "super lustre reduction glass" from Double Helix. I was expecting a silver mirror shine, which truthfully wasn't exciting me too much. But oh boy, I disagree! I didn't get mirrored silver, I got beautiful golden liquid sunshine!
Helios turns a lovely pomegranate shade when heated, then fades back to amber as it cools. It quickly reduces to a golden orange shine but will turn cloudy if overheated - happily the cloudiness is easily removed by heating through thoroughly, cooling then reducing again.
My best results are when Helios is reduced and left on the surface, even careful encasing can burn off the shine.
In this dark ivory heart bead, I made one shoulder from unencased Helios, reduced to a golden orange lustre. The Helios has lightly fumed the dark ivory.
Here's an encased lentil, I started with white then added Helios, cooled, reduced and encased with 006 - I added some Helios stringer on the surface too. Its difficult to see in the photo but there are delicate golden wisps inside and golden orange lustre on the surface.
This big hole bead is made from Tongue Pink (please, please, please can we change this glass's name ... lets call it Striking Terracotta!) then I covered it with dots of Helios. Some I melted flat, reduced and encased with 006 (orange Mother of Pearl effect), the others I reduced and left unencased for an orange mirror shine.
I played with lots of different bases for the Helios. It really fumed this transparent red bumpy bead. The dots round the centre are Helios over Dark Ivory, the other dots are Helios straight onto the red.
Now for more encasing experiments. I got mixed results really - some good, some quite disappointing but then one of the exciting things about Silver Glass is its unpredictability! Let's start with the nice ones ... Helios swirled with white and some Silver Foil. Not particularly shiny, but still a very pretty creamy gold.
Over Opal Yellow and Transparent Amethyst and silver foil - hurray, I see lustre (okay, maybe you can't see it in the photo, but its definitely there, that lustre you get on fish scales!)
But these groovy beads weren't so successful. The Helios over Black or Straw Yellow (both with silver foil) initially reduced beautifully but, even though I thought I'd kept the bead cool whilst encasing, the lustre was lost on both these Groovy beads - the greenish tinge is very disappointing.
These rounds all started off with Transparent Striking Red, then Helios (the middle bead also had silver foil melted into the Red), then encased - again, no nice lustre, just mucky yellow.
To finish on a happy note, I had to try a sprinkle of raku frit, just like some beads that Claire Morris added to the Silver Glass group on Flickr - thanks Claire!
NOW for the second glass I've been playing with, Effetre 'Cool Colour' Marine Wave.
It reminded me of one of my favourite colours, Baby Blue 038, so I have based most of my testing on a comparison with this glass - which I will refer to as 038. The main difference on comparing the rods is that Marine Wave appears to be ‘seeded’ with tiny bubbles, whereas 038 is a very clear palest blue. I can see subtle stripes in the Marine Wave as it melts but the stripes are lost when applied to the mandrel.
I started with some simple round beads and added Silvered Ivory Stringer and silver wire. The bead on the left is 038 and is virtually indistinguishable from the Marine Wave.
The similarity is more apparent when they're etched - in fact I'm not entirely certain which of these beads is the 038, I think its the one on the left again!
You can see the tiny bubbles in this lentil on the right - I have to say, I prefer the clarity of 038. The Marine Wave lentil has some yellowing, probably due to fuming by the silver.
I tried the trick that Sarah Hornik reported on Torchbugs, a Hades base with silver foil melted in, then Marine Wave stringer and encased in clear. I tried the same experiment over Hades, Copper Green and Transparent Striking Red. Over Hades, the scrolls turned greeny blue; turned brown over Copper Green and acted like clear over the red (not a great bead!).
I made a similar bead using clear stringer over Copper Green and the outcome is definitely different to Marine Wave.
Finally, I also tried Marine Wave with Dark Ivory as reported on Lampwork Etc., there is a dark reaction line where the colours meet.
In conclusion, I'm rather underwhelmed by Marine Wave. Its pretty enough, but I really do prefer 038 and if I want bubbles I'll use some bicarb!
Sunday, 6 February 2011
The Morning After The Long Day Before!
Yesterday was one of those lovely, unexpected days that don't happen often enough, although it certainly didn't go to plan!
But a long day at the torch has its downside - a big old mess, two kilns to empty and lots of beads to clean and photograph!
Here's a closer look at that mess, I must clean up before the next student arrives.
If you look very carefully, you can just about see the torch to the left of the photo. I'm not good at putting tools away, I just keep piling them up on top of each other!
It must have been around midnight when I actually turned the little kiln on so it was still hot hot hot when I got up this morning!
That cup reminds me - I usually drink decaff tea, maybe it was the Nescafe that kept me working till 2am! And awake for another hour after that, my head was buzzing.
I can't show you the beads on the left of this kiln just yet - I was meant to be working on some new Seaside beads for an upcoming gallery exhibition, but an unexpected delivery threw me right off track and I spent a very happy few hours totally absorbed in trying out some new glass for Tuffnell Glass. Sorry, I think I need to keep these beads under wraps till I show The Boss!
So here's some of the work I can show you. I love to see them like this - off the mandrels, waiting for me to clean the bead release from the holes. Its my first chance to get a good look at each new creation and the water washes the dust away and shows up the colours beautifully.
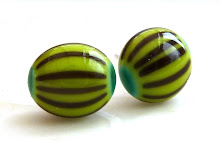
And here they are, all cleaned up and smiling for the camera. I've been building up to these for a while - I've always been drawn to bright colours and love the cartoony boldness of black outlines. I confess these are heavily influenced by the work of Tera Belinsky-Yoder but I hope there's enough of my spin on them to be original.
Now, shall I clean up that mess, or just go and make some more ... ?
Spotty Saturday and Silver Sunday
Just a quickie to point out a link to the photos of last weekend at Mango Beads studio.
On Saturday we dealt with all things dotty - the girls had great fun with plunging, poking, raking and stacking. The piggie buttons went well too - and then they tried monkeys .... go see Manda's photos!
On Sunday we played with silver - foil, leaf, wire, mesh, and silver glass. I think everybody felt they learnt lots, including pressing and shaping beads too.
I'm planning on running these classes again in my new home studio - more details about that soon!
On Saturday we dealt with all things dotty - the girls had great fun with plunging, poking, raking and stacking. The piggie buttons went well too - and then they tried monkeys .... go see Manda's photos!
On Sunday we played with silver - foil, leaf, wire, mesh, and silver glass. I think everybody felt they learnt lots, including pressing and shaping beads too.
I'm planning on running these classes again in my new home studio - more details about that soon!
Sunday, 16 January 2011
Read All About It!
I'm feeling a little (over? nah!) exposed - Lush Lampwork beads or buttons are cropping up in so many magazines at the moment!

The New Year kicked off with a competition to win one of three sets of Sunspots Buttons in Cloth magazine - which are actually not in the photos but can be seen on my Shank Buttons page.
Then there's a chance to win one of five sets of my Dusted Heart Trios in Make Jewellery - three hearts with a pearly finish, perfect for Valentine's Day.
With two tutorials and brilliant coverage on the Product Review pages, Lush Lampwork really is all over Making Jewellery magazine, issue 24!

What a great start to 2011!
So how about a little competition for my blog readers?
If you'd like to win a Toggle Bracelet Kit, just send me an email to julie@lushlampwork.co.uk with the answer to this question ... "on how many pages in Making Jewellery Magazine issue 24, does a Lush Lampwork item appear?"
(if you don't have access to the magazine you can still have a guess, the answer is somewhere between 1 and 12).
I'll select the winner from correct answers received by 9th Feb - issue 25 is due out on the 10th. The winner can choose their prize from the Toggle Bracelet Kits available on my website at that time.
Tuesday, 9 November 2010
by george, its Lush!
What a fabulous weekend! 6-7 November 2010 – the first time that George Harper East and I taught our “by george, it’s Lush!” class.

The venue was Mango Beads studio in Barnstaple, North Devon.
Manda and David have created a wonderfully calm, comfortable space, that manages to be both fun and inspiration, without detracting from the serious business of melting glass!
Six eager students arrived around 10am on Saturday and after a welcoming cuppa and chat, they each claimed a workspace and gathered round to choose their glass colours and watch my first demo.We all worked happily till late in the afternoon, making a range of beads in bright funky colours, with spots and twisties, silver foil and presses.

Lunch was eaten quickly – no time to relax for too long, there were beads to be made! I think I worked them pretty hard, everybody was tired out by the end of the day!
Most of the group met up for dinner at Pizza Express later that evening. It was lovely to have chance to get to know each other better and relax with a well-earned glass of something!
On Sunday morning, everybody arrived bright and early, excited to open up the kilns and claim their beads.
After much examining and admiring, and a fair bit of cleaning and even some etching, it was George’s turn to take charge.
She set up her command centre at the far end of the studio and produced an impressive collection of pliers, hammers and other metalworking tools that I wouldn’t even know the name of!
In no time the group was turning loops, wrapping wire, hammering and filing and beautiful, unique jewellery collections were appearing all around the room.
Everybody went home proudly wearing their own earrings, bracelets and brooches – armed with new skills, knowledge and friends!
Check out my Flickr album (the photos were taken on my phone, so the quality isn’t great) and Manda’s for more pics.
We will be running the class again at Di East’s studio in Leicester on 19-20 March 2011. We’ll also be back at Mango Beads with the class again on 8-9 October 2011 and will both be teaching other classes in Barnstaple during 2011 too. Watch my website for more dates and details.
Wednesday, 6 October 2010
Messy Testing ... Tuxedo
A confession .. I've never used CIM Tuxedo before yesterday.
But now I have, I will again, cos I like it! I definitely found it less stiff to work with than the other CIM black, Hades, and it kept its colour really well on white and clear. Also I find Hades tends to break, rather than shock, when I'm heating it - Tuxedo didn't do this.
First of all I made three little black beads using Tuxedo, Hades and regular Effetre black 591064. You can see from the photo that neither of the CIM blacks performed too well in this test - they both show some slight reduction and shadowing around the edge of the white dot, whereas the white dot sits clean and crisp on top of Effetre black.
When used as dots on white, the Tuxedo fares better than Hades with only a slight metallic edge, while the Hades shows considerable bleeding into the white. Again though, the Effetre black is crisp and sweet.
I have read that both the CIM blacks do exciting things when used with silver foil so I made three big hole beads and rolled them in a strip of foil. I melted in the silver, allowed the beads to cool off then wafted them through a reducing flame - I think they all look the same!
Hmm, not having much luck so far ... how about trying out some webbing. This time I added Effetre Intense Black to the party. The photos speak for themselves - top marks goes to the Intense Black, closely followed by Hades. The Tuxedo has certainly softened and spread, and the Effetre black hasn't webbed at all!
But the biggest surprise result in this test is the colour of the different blacks - I expected the Effetre black to appear quite purple when etched, but look at that Tuxedo - its indigo!
Finally, I think Tuxedo has worked really well on these "crab" beads, simple black dots on the edge of Effetre Clear 006 lentils, etched.
I know from past experience that Effetre black doesn't work in this design so have previously used Hades.
Tuxedo is around a quarter of the price of Hades so I know what I'll be using in future ;0)
But now I have, I will again, cos I like it! I definitely found it less stiff to work with than the other CIM black, Hades, and it kept its colour really well on white and clear. Also I find Hades tends to break, rather than shock, when I'm heating it - Tuxedo didn't do this.
When used as dots on white, the Tuxedo fares better than Hades with only a slight metallic edge, while the Hades shows considerable bleeding into the white. Again though, the Effetre black is crisp and sweet.
Finally, I think Tuxedo has worked really well on these "crab" beads, simple black dots on the edge of Effetre Clear 006 lentils, etched.
I know from past experience that Effetre black doesn't work in this design so have previously used Hades.
Tuxedo is around a quarter of the price of Hades so I know what I'll be using in future ;0)
Subscribe to:
Posts (Atom)